Wood Designer forum
Quarterturn stair|Page 2|Forum|WOOD DESIGNER

Hi All,
Slowly, slowly our new stair is taking shape.
For all amatures like myself, I must say, with stairdesigner you get a possibility to build your own stair. Well I haven’t reached the goal yet but there is hope.
Some photos are uploaded at my blog.
https://petralindelof.blogspot…..stair.html
Best Regards
Petra

Thanks,
I think I got a french version but I can probobly figure out what the words mean. The figures are at least in mm ![]()
I will try to open the dxf in my light verson of cad so I get all the measures. Is the pdf meant to be printed 1:1 and used as a fillsize template?
The left stringer at the first flight I will lengthen towards the wall as you proposed and make a post under the right stringer or in worst case attache the whole stair in the wall…
This will be great (I hope) 
Best Regards
Petra

October 4, 2012
 Offline
Hi Petra,
The strings will be OK to build from 66×315 but as always with stairs with winders, you’ll have to glue extra width on the sections supporting the winders.
I attach the final StairDesigner files for your approval.
Note that the shape of the stringers should be edited to make them flow better and easier to build.
All the best,
Ness

October 4, 2012
 Offline
Hello Petra,
Your stair looks fine like this . I have just adjusted a little the winders so that they are spread more evenly around the turning and move the last post forwards so that the last step nosing is not flush with the post face .
If you are OK with this last design I can send you the manufacturing files.
All the best,
Ness

Hi again,
My height calculation wasn’t that bad ![]() Floor to floor it will be 2860mm.
Floor to floor it will be 2860mm.
We will keep the beem in the celing almost as it is which means the hole will have a width of 760mm. So we keep the stair width at 800mm and adjust tha last step to fit between the wall and the beem.
The newel post in the inner corner will be placed under the beem where it will be cut of to make the hole a bit L-shaped. I made the first flight a little shorter so there is less impact of the window and a not so many steps without handrail on the right side. The handrail for the right hand on second flight we will make when the stair is in place. And there will be a wallmounted handrail all the way up on left hand.
I have rounded (again) the steps on right side and will use a tool for which I don’t know the english word to make a nice oldfashion shape on the front and right side of the steps.
Does this sound like a possible plan? and please feel free to correct my stair (again) if you have any hesitation about my recalculation or shape of the steps…
Best Regards
Petra

October 4, 2012
 Offline
Hi Petra,
Without a handrail on the second flight your stair will be quite dangerous.
On the other hand you could take away the first handrail.
Making the stair wider is possible but 800m wide is already not bad for a normal stair.
Be careful if you make the stair wider your stair well will also have to be wider!
We’ll be waiting for the next installment!
All the best,
Ness

Thanks,
It’s a good thing to picture the stair i the room. It will be a pretty narrow stair. Agains all better knowing I’m tempted to remove the handrail and stay with a wallmounted handrail or second choise is to make the stair wider. At this point I wish I had the skill to make a lovely curved stair ![]()
We will start up the project and make the hole. Be aware… I’ll be back…
//Petra

October 4, 2012
 Offline
Hi Petra,
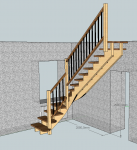
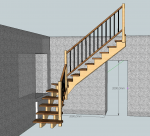
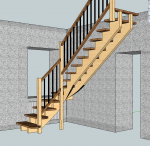
I’ve made a quick SketchUp drawing to show how the stair will look in the room:
As you can see the stair stringer looking face on hardly covers the upper left corner of the door. This wouldn’t be an issue even if the stringer was against the wall. But looking at your photos, it will mean that the door will only open to 90°.
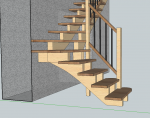
Your design should work fine . Note that to stabilize the stair, you will need to anchor the end of steps 6 and 7 firmly on the wall. However the joint between the stringers will be taking a lot of strain and might with years begin to play.
To avoid this and make it unnecessary to fix the steps on the wall you might consider making these 2 modifications:
1- extending the first left string to the wall:
We cannot add this in StairDesigner so you’ll have to add it either by editing the DXF file or by hand on the PDF print outs.
Note that you’ll need to edit a bit the shape of the cut strings so that they jon harmoniously.
2- extending the corner post to the floor:
This will make the stair nearly free standing, only fixed at the start the end of the first stringer into the wall and at the first floor.
The stair would be perfectly stable with no risk of play in time.
I attach the SketchUp model .
All the best,
Ness
1 Guest(s)


 Home
Home


