Wood Designer forum
book cabinet|Page 2|Forum|WOOD DESIGNER

November 8, 2013
 Offline
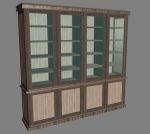
Hi everyone, we’ve added this bookcase template to our Template Library. Click here to download it and lots of others…

October 4, 2012
 Offline
Hi Michel,
Nice to see you back on the forum with you project moving forwards.
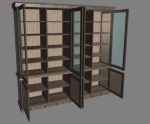
I attach the new model that I’ve cleaned up a bit to make it workable.
I’ve rebated the back into the sides, top and bottom, like this the back can be pinned or screwed into the carcase.
You can change to grooved and it can also be cut into several parts to be more manageable.
The door /side panels are grooved 12mm into the frames and I’ve set the upper glass flush to the front of the frames so that they can be set into a rebate and held with beading. Of course the actual depth of the rebate and beading will depend on the thickness of the glass.
I’ve also created a different rule to set the shelf pegs in the solid wood surrounds of the uprights.
Note that the Blum hinge holes in the upright will need packing out to accommodate the difference in thickness of the solid wood and panels.
Hope this is all ok for you .
All the best,
Ness

August 7, 2014
 Offline
Hi Ness
there was some delay on this project . Measurements were not sure and now they are . Can you send me a updated list for a width of 2800 . The base cab depth should be 550 . The upper cab depth is 450 . The rest remain the same . I only saw some strange cuts like the back. The cuted panel falls just between the left and right panel and also the bottom and top panel . It means that there is no possible connection between the side panels and the back panel . I tought there would be some connection trough a groove in the side panels so that the back will fit into it and make the whole cab steadier as a whole piece . Also i do not find the depth of the groove for the panels to be fitted in the doors , side panels and vertical divisions .
The mobile shelves are also not so clear how they are positioned . When I looked at the panel drilling there are holes to be drille 2mm from the side of that panel ?? Wit a diameter of 5 mm . Strange because that same panel enters a groove form the beach frame. So I do not realy understand this.
Can you reply asap as I have to start this from tomorrow already ?
regards
melon michel

August 7, 2014
 Offline
Hi Ness,
ok thanks . I start with it and will show some pictures later on
regards
michel

October 4, 2012
 Offline
Hi everyone,
Thank you Mark for your comments and helpful remarks, I see that you are getting to be a real expert in Polyboard.
You are perfectly right, I actually started with 80×25 bars and then decided that the design looked better with 60mm and didn’t change the name.
All the lengths are with 30mm tenons.
Polyboard will out put the framed panels OK so playing around with panel assembly can do some neat designs.
All the best to everyone,
Ness

August 7, 2014
 Offline
Hi Ness
thanks a lot . I wil have to look at it more closely and return with comments if needed . One thing I see is the cutting list for (bar) beech . It is mentioned 80*25 and 60*25 but there is no indication in the list which are 80 and which are 60 . I also presume that the measurements and netto and that i have to add tenoning length.
regards
michel
Once again Ness
Crafty way of doing the plinth…. Took me a minute to work out the process, but perfect way of getting mitres on the edges.
I set up a plinth manufacturing method with the bottom overpassing all panels to allow all the plinth sections to be available and to save time as the regular panels are nil and this is a good one for the library…
Mark

October 4, 2012
 Offline
Hello Michel,
Here’s a template for your cabinet.
I have set this up to show the general principles for making framed panels.
You will have to tweak the different elements according to your needs.
You’ll find in the zipped file the PolyBoard project “book case” that contains the for cabinets, base cab, upper cab, plinth and cornish assemble together in a project.
I have put together also the manufacturing output for the project.
Of course the materials and manufacturing methods that I set up are only examples and you will have to modify them according to your needs.
Note that things like the upper moulding and plinths can only be simulated with rectangular sections. For more precise detailing you will have to export the PolyBoard model into some CAD software like SketchUp. But setting up model in PolyBoard enables one to play around with different designs and of course get all manufacturing documents automatically.
If you need help tweaking send me details of what you would like, and I’ll see what I can do.
Hope it is all helpful,
all the best,
Ness


 Home
Home


