Manufacturing methods
PolyBoard Essentials: Previous | Next
- Manufacturing methods versus manufacturing sub-methods
- The benefits of using manufacturing methods
- Specialist drawer and door manufacturing methods
- A note on naming
- Manufacturing sub-methods
These methods are a series of style sheets that define your construction preferences.
Manufacturing methods versus manufacturing sub-methods
The sub-methods are specific style sheets for carcass construction, materials, drawers and so on. Combined they provide the instructions for your production process.
A manufacturing method is simply a way to group the sub-methods so you can apply them together. To access the list of manufacturing methods go to:
Libraries menu > Manufacturing methods

Or click on this icon in the Quick Design Methods toolbar:
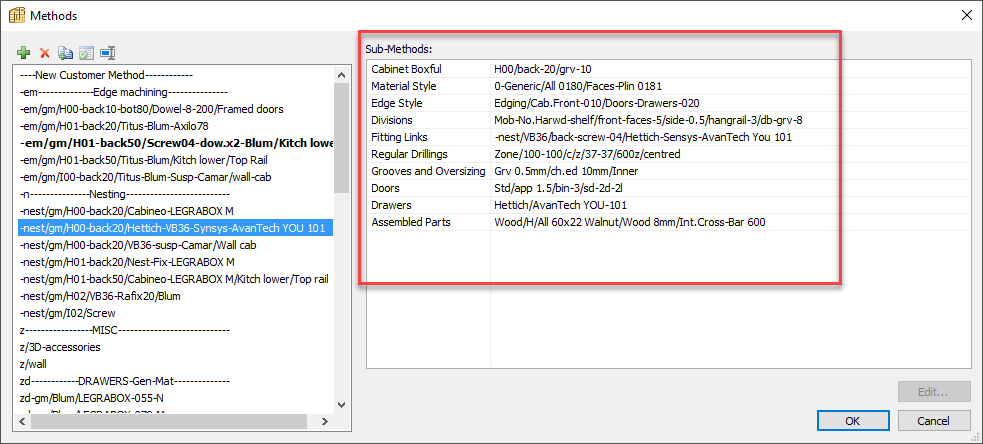
If you look at the image below, you’ll see that the manufacturing method highlighted in blue is simply a list of manufacturing sub-methods:
The benefits of using manufacturing methods
PolyBoard’s Quick Design libraries come with a large range of manufacturing methods and sub-methods, but you can build your own methods and sub-methods from scratch, or copy and edit the methods already present.
Utilising methods massively speeds up the design to manufacturing process, and eliminates production errors. Workflows options might include:
- You have a single unified way of building all your projects; set up one manufacturing method that contains sub-methods for all your production preferences, for each new project simply focus on sizing your cabinets (from a pre-existing model library if you wish) and then apply your manufacturing method with the click of a button
- Working on an unusual project with a different drawer system; apply your usual manufacturing method, then swap out just the drawer sub-method
- Want to appeal to customers with different budget requirements; create multiple manufacturing methods that include different combinations of materials and high to low-end hardware
- Made a decision to move to a new panel assembly system, say moving from cam and dowels to Cabineo; just replace your Fitting Links sub-method and you’re good to go
Specialist drawer and door manufacturing methods
We have listed some door and drawer specific manufacturing methods.
These are applied in addition to the main manufacturing method. This allows you to use your normal method and just swap in a specific drawer or door type, say a new Blum drawer system you’re testing out.
To do this, apply your manufacturing method, then apply the second one and choose the option to ‘Apply the method to the cabinet new components’:
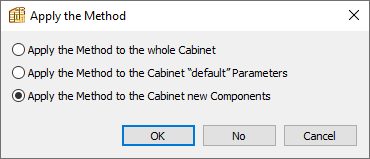
Now add your drawers or doors and they’ll use the new manufacturing method set up just for them. The rest of the cabinet will be unaffected.
A note on naming
We’ve included a large range of methods and have developed a naming convention to keep things organised and to reference various key elements of each method.
The naming conventions used are explained in the Quick Design libraries manual, which is available to read in the Quick Design libraries folder/Guides.
You will likely use a much smaller set of methods and can name them to suit your preferences and for ease of reference.
Manufacturing sub-methods
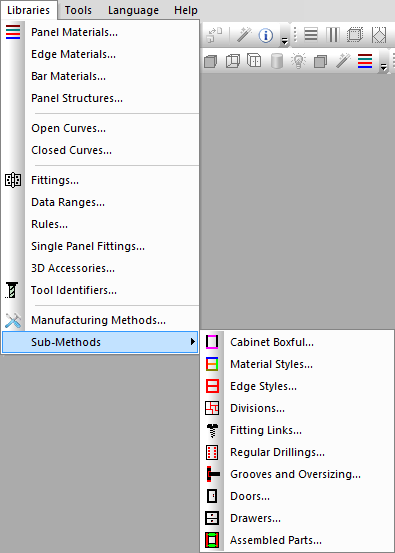
Below we list and describe each sub-method. To access each of these sub-methods go to:
Libraries menu > Sub-methods
More details:
Extended: Quick Design libraries
We also offer a Custom hardware and libraries set up pack to help you configure your most commonly used methods, and the library components to go with them.
Cabinet boxful (carcass construction)
This sub-method defines how your carcass is constructed. It’s a nice one to start with as it provides a good visual representation of the power and flexibility of PolyBoard.
Here you can see some of the pre-configured options, but it’s always possible to create your own too.
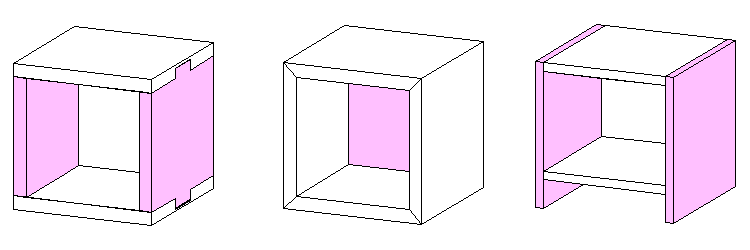
In the image below we’ve highlighted the sub-method H00/tong-grv/back-10/grv-10:
And within that sub-method we’ve again highlighted the relationship between the side and top configured as follows:
- The sides overpass the top
- Applied a mortise and tenon/tongue and groove joint
Other rules are applied to build the overall construction method.
Material styles
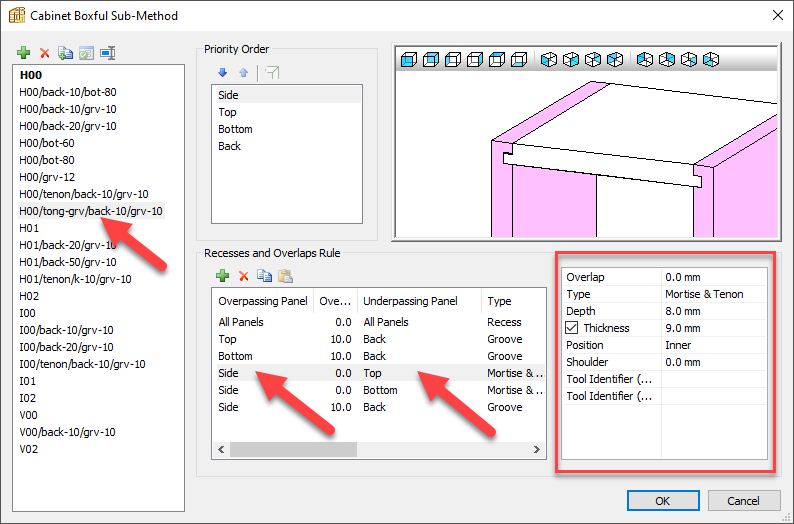
This sub-method specifies which materials should be used for which panel types.
In the highlighted example 0-Generic/All 0180/Drw 0160-0080/Back 008/Faces 0181 you can see in the window the material choices for:
- All panels – default unless another material is defined for a specific part
- Doors
- Back
- Different drawer elements
The material for each can be chosen from the drop-down box as shown, all of which are stocked in the Panel materials library.
Selecting the green + icon allows you to link materials to other panel types like fixed and mobile shelves, plinths and side panels.
In the Structure tab, you can also associate a structure with a panel type, stocked in the Panel structure library.
Edge styles
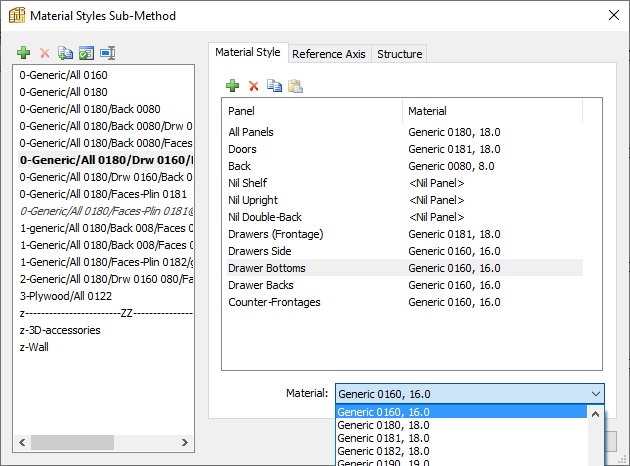
This sub-method allows you to fine-tune exactly how you would like to apply the edging.
In the highlighted line of the sub-method in the image above we can see that in all cases the edging material edge-020 should be applied to the doors.
Your edging material choices are stocked within the Edge materials library.
Divisions
The following division part types can be managed with this sub-method:
- Shelves
- Uprights
- Free divisions
- Double backs
- Inner casings
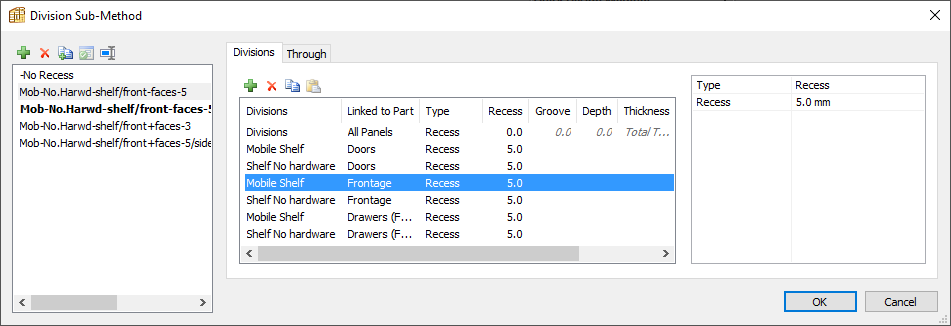
It is primarily used to define how they join to other panels using these options:
- Recess
- Groove
- Mortise and tenon
One application could be to automatically recess/set back your mobile shelves by 3 mm but keep your fixed shelves flush with the cabinet front.
Fitting links
This important sub-method defines in what circumstances you would like to apply specific hardware.
We’ve highlighted in the image below one line of a sub-method:
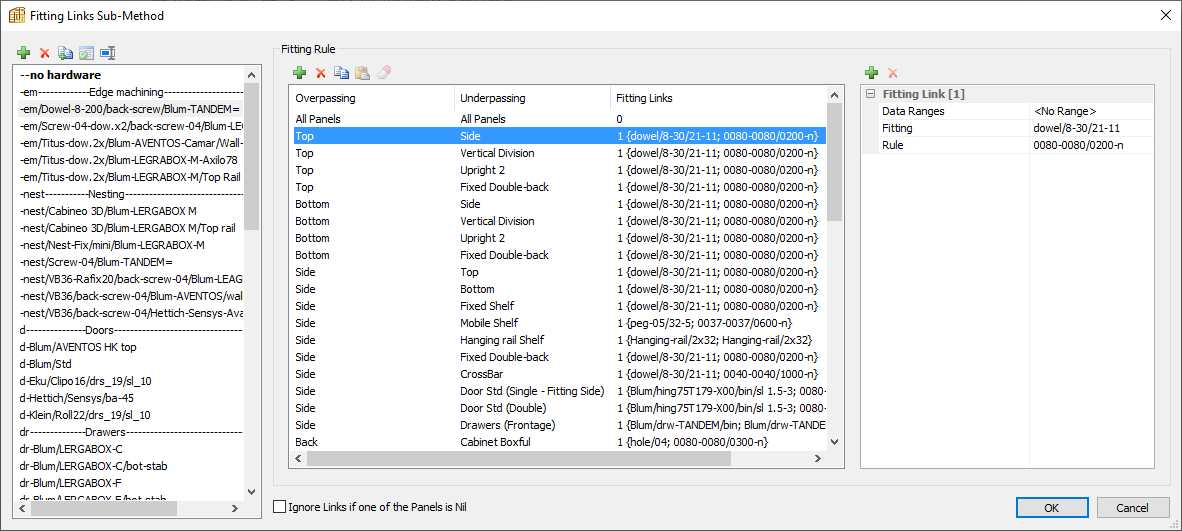
This confirms:
- Where a top panel overpasses a side panel
- Apply the fitting: dowel/8-30/21-11
- Using the positioning rule: 0080-0080/0200-n
Again, we can see how the sub-method works in conjunction with PolyBoard’s libraries:
- The fitting is stocked in the Fittings library
- The rule is stocked in the Rules library
We also have some door and drawer specific sub-methods listed which we discussed in the Manufacturing methods section above.
There is a large range of sub-methods setup, in reality, you would be using one or a limited number that contains your particular preferences.
More details:
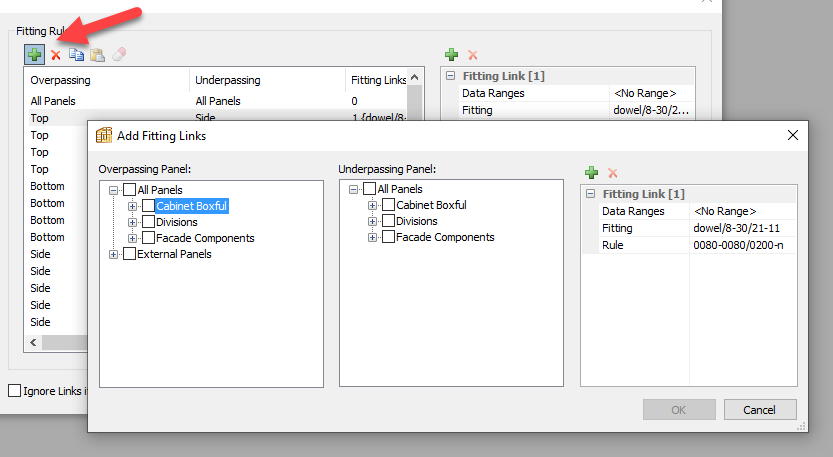
★ Tip ★
Some of the sub-methods look quite long, with lots of options relating to different panel combinations.
In fact, much of this is added automatically by PolyBoard’s menu system, accessed when you select the green + icon:
Regular drillings
This is used to specify how to apply a row of drillings distributed as a group or continuous string. This is an alternative to linking drillings to a mobile shelf for example.
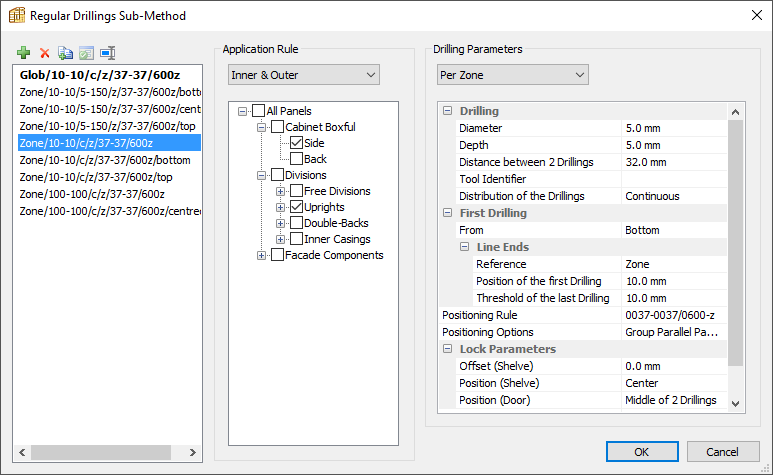
There is a large range of parameters so you can configure PolyBoard exactly to your production methods.
Groove and oversizing
A specialist but useful sub-method to:
- Add slack to grooves for easier assembly
- Add extra material to your panels to allow for profiling later in production
- Excluding oversizing to specific panel types (e.g. back panel)

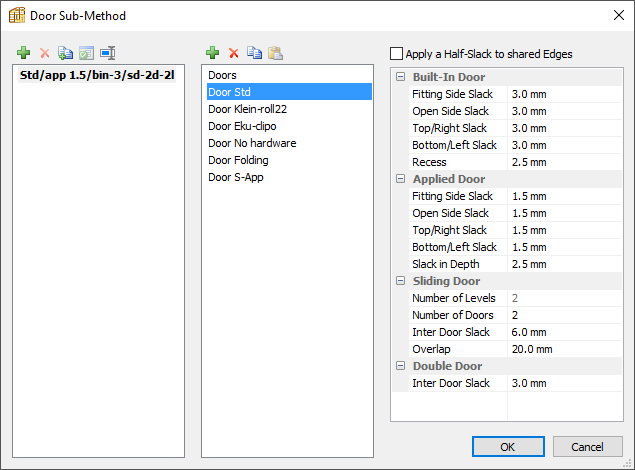
Doors
This is used to set your slack parameters for each door type.
Drawers
Similar to the doors sub-method, define the correct slack around your drawers so they fit in place, along with any hardware, 100% accurately every time.
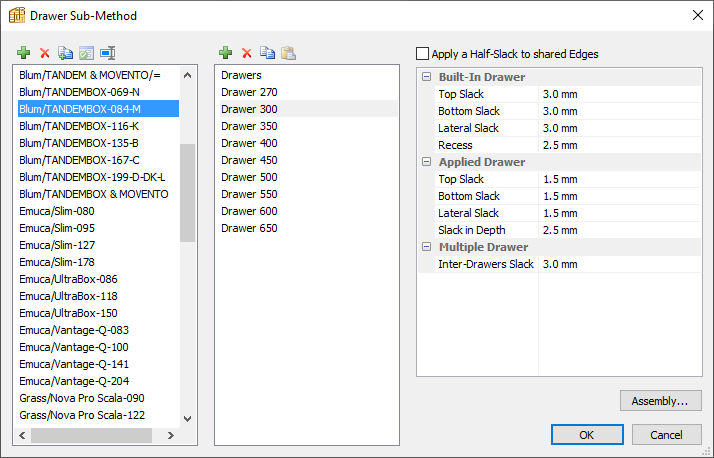
Note the Assembly button bottom right, this opens up a new window to pre-configure a range of additional drawer parameters.
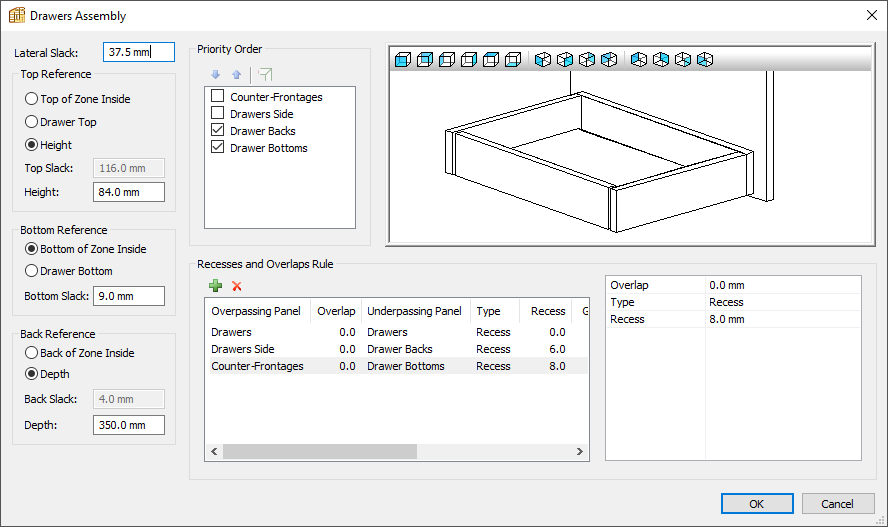
To ensure PolyBoard is flexible enough to accommodate 1000s of different setups, drawers do include quite a lot of parameters.
However, once set up, you can apply them along with all your other preferences using the Manufacturing methods system very quickly and error-free.
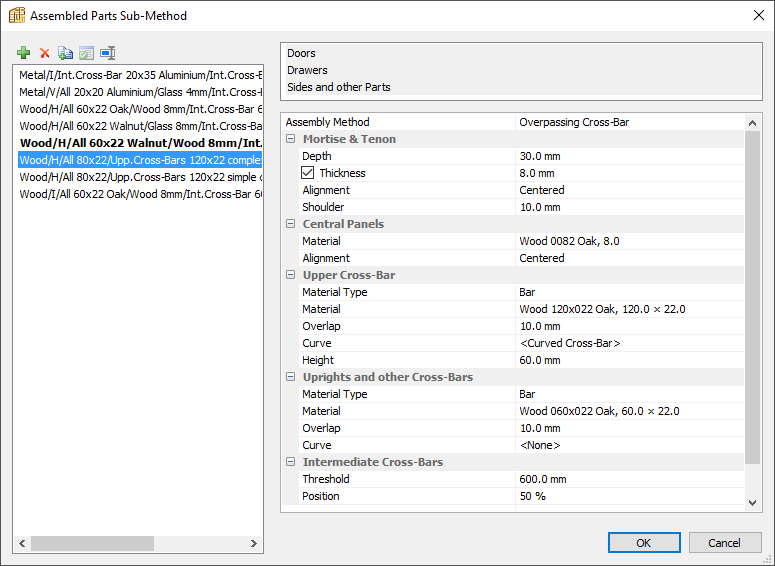
Assembled parts
Used as a pre-set for the parameters used when adding frame and panel assembly details via the Structures menu > Assembly command, typically to your drawer and door facades.